Tot has been eating a lot of grilled cheeses lately which has led me to wonder if I can create my own versions of some awesome adult friendly grilled cheese sandwiches. So, I’ll be starting to do that very soon. But, it’s also led to that time of year when the weather is just H-O-T and we want something that’s filling but doesn’t weigh you down for dinner. So, we’ve been doing a version of BLT’s. If you think you can’t improve on a BLT you’re wrong. There’s a whole other level of awesome. Have I mentioned a recent love of avocados? When I was younger I wouldn’t go near them because of having the honor of trying the world’s worst guacamole. Within the last three years is when I’ve come to love guacamole and avocados. Well, welcome to my world with the TABLE sandwich. Or BLEAT or BLATE or however you want to call it. We go with TABLE. It’s a loaded sandwich and is delicious.
You need:
A couple already cooked and chilled hard boiled eggs peeled and sliced
1 lb bacon (thick center cut is the best)
1 medium ripe tomato sliced
A couple leaves of iceberg or romaine lettuce
2 very ripe avocados (mash half to spread and slice the other half)
Toast
Mayo (optional)
Fry up a pound of thick center cut bacon. This will be enough for two adult sandwiches and a slice each for the mostly vegetarian kiddos who go berserk for bacon which is no surprise. We bake ours in the oven to cook it because I hate getting burned with pan frying. While it’s cooking do your other prep work of slicing and washing the vegetables. When it’s ready to assemble put it together however you like. Hubs doesn’t use mayo on his. This is one of my few mayo exceptions, but I use maybe two teaspoons total. Just a very fine layer on both pieces of hot toast. I work with one side of the toast after that and use the other piece to close the sandwich because it is loaded down. On the side I’m working on I take half an avocado and spread it onto the mayo’ed up toast. On top of that I put a couple pieces of piping hot bacon, then some lettuce, then the sliced hard boiled egg, the other half of one avocado sliced. Then top it off with a slice of two of ripe tomato and close the sandwich up. The tomato works well with having a little mayo against it. Sit down and enjoy. Keep a napkin near by and make sure to grab anything that tries to escape. I do this sandwich as well without the bacon and it is also very good on a hot summer’s day. Enjoy!
P.S. I'd post a pic but it was relatively dark in the kitchen the other night when I took a pic and I couldn't resist the sandwich. It was crumbs before I thought to go into the sewing room for better light. Next time.
Friday, May 11, 2012
Friday, April 13, 2012
A different take on cookies
Life is busy lately and I've needed a mental break from trying to think of anything creative because with two toddlers I fear creativity will never come back! We love cookies in our house, especially chocolate chip. Here's what I do when we make ours. They're not healthy but they are tasty!
What you need:
2 1/4 cups flour
1 tsp baking soda
1/4 cup brewer's yeast (buy on Amazon or local health food shop)
1 cup softened butter or coconut oil
1 cup packed brown sugar
1/2 white sugar (you can probably omit the plain white, but I haven't tried it)
1 tbsp vanilla extract
1 tsp blackstrap molasses
2 extra large eggs
12 oz of semi sweet chocolate chips
1 cup chopped walnuts or hazelnuts, optional
Preheat oven to 375 degrees. Mix first four dry ingredients in a bowl and set aside. Cream butter, sugars, vanilla extract and molasses in large mixing bowl until creamy. Add eggs one at a time. Gradually add in flour mixture. Stir in chocolate and nuts. Scoop onto cookie sheet with cookie scoop for even cookies. Bake for 9-11 minutes on metal pan or 11-13 on stoneware reducing time as needed. Makes 48-60 cookies.
Tot loves helping make these as does Daredevil. I measure it out and they put it in the mixer bowl. It's a half hour of hamony and peace in the kitchen.
Monday, January 16, 2012
Pierogies aka 'Rogie Love
We love pierogies in our little family. These are not dairy-free so Daredevil only eats one or two and gets a dose of Claritin to combat the rash and other problems that happen when she has dairy. I’ve made a batch dairy free and they’re good but they need a lot of salt and pepper and olive oil to really make them sit nicely on the palate. It can be done though so if you’re always dairy-free don’t be afraid to omit the cheese!
Lots of recipes on the Internet but this is pretty close to what we know and love. Back where we came from there is a Russian Orthodox Church and they sell these. So wonderful, but we’re no longer there and had to come up with as close as possible. I highly recommend two people for the job. One person can do it, but it is very time consuming. If you can get more people to help then that’s even better. Make sure to reward everyone for their efforts with a dozen or two to take home. But, if not two people (and two “helping” toddlers) can do the job in a day. And yes, it will take all day. And I’ll include a cost breakdown at the end.
To start the prep:
Peel 5 pounds of russet potatoes and cube them up. Stick them in a pot of water and boil until fork tender. Like you’re making mashed potatoes.
Peel and chop 2 lbs of onions. I stuck them in my food processor and made them almost a puree consistency because Tot won’t eat them if he sees onion pieces in there. But, you need the flavor of onions in there.
Peel and slice in half circles another two pounds of onions and set aside. These need to be lightly sautéed in butter until slightly translucent and set aside to go on top of the boiled pierogies.
Grate two 8oz blocks of the sharpest white cheddar cheese you can get. I used New York Extra Sharp Cheddar, because they were out of anything sharper. Quality counts here so don’t skimp. Use coupons, but buy the best you can get in the cheese case.
Once you’re done this you’re ready to start prepping the dough.
Dough:
4 cups flour
4 eggs
1 cup water
1 ½ tsp kosher salt
Mix all of this together until it comes together nicely in a ball. Turn it over onto some lightly oiled saran wrap and cover with the ball. Let rest for at least 15 minutes. You can also make this the night before and let it rest in the fridge. Keep the bag of flour handy because for 5 lbs of potatoes you will probably use at least a 5 lb bag of flour between making batches of dough and what you use to flour your rolling surface. No lie, last time I made them I had to send hubs out last time mid-batch making because I ran out of flour. I’m prepared today with a fresh bag and an extra in the pantry. If there’s any dough leftover at the end of making all the pierogies, roll it out thin and cut into strips. Let it hang dry and you have fresh homemade pasta. Bonus!
The filling:
Mash together 5 lbs drained potatoes, the 2 pounds of onions you either pureed or diced very finely, and the grated cheese along with about 2 tbsp. kosher salt. I used the cup of my palm since my hands are smaller and eyeballed it. Taste and add more salt (or not) to your preference. This time I also added 4 heaping tbsp of nutritional yeast flakes in there since we’re trying to get more nutrients into Tot. Optional, but we’re desperate most days to get him to eat which is a whole other story not for today.

Assembling: (here’s where having the second person really helps cut down on the amount of time and takes away the monotony, but you can do it yourself by rolling an filling a batch and dropping them in the boiling water, repeat the rolling and filling while the boiling ones are cooking.)
Set out your rolling mat or have a clean counter. Sprinkle some flour down so your dough doesn’t stick. Roll out the dough very thin. I used a guide that was about 3/8” thick, but then I took them off and started gauging pretty spot on. Pull off a ball of dough from your rested dough and start rolling until you have a nice sheet. Make sure you keep a little pile of flour ready to sprinkle on the dough and your hands as you’re rolling and turning the dough. I turn it at least once because the spreading dough sticks. Using a 2.5 inch cookie cutter gives nice size pierogies. You can use larger if that’s what you’re used to or want. Cut out as many circles as you can. Then put a teaspoon of filling in each circle. I scoop a little in my hand and give it a little squeeze before I put it in the circle. Makes it easier to close and has the right density.
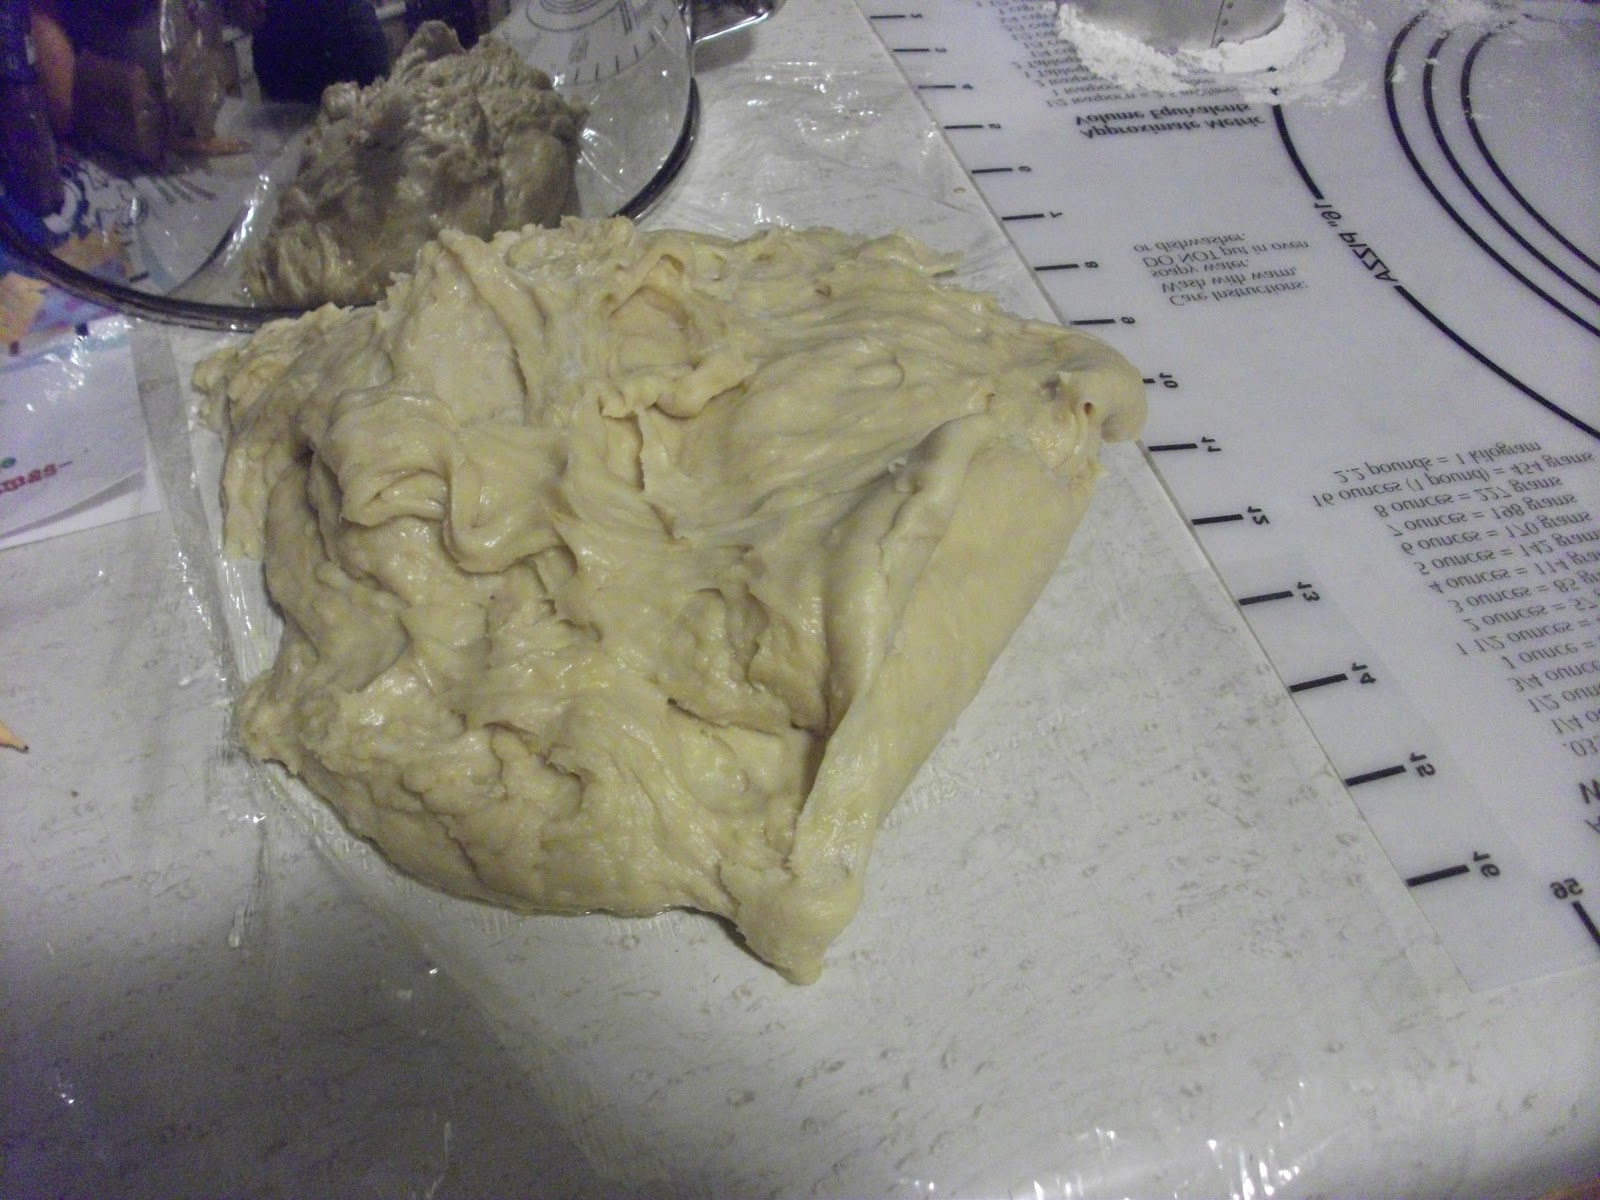
Dough just turned out of the bowl before resting

About the size of dough I pull off to roll out

About the right thickness

Give the filling a little squeeze for density and fitting nicely in the circle

Ready to gently stretch the dough over to close and seal

Before boiling

Boiled and ready to fry up! We tried to make a few shapes for Tot to enjoy with the holiday cookie cutters. (cut out two shapes to stick together once filled for this one. No folding here because you'll lose the cool factor)
Keep a little bowl of water nearby. Using your finger or a brush, lightly brush half of the circle edge with water. Fold in half and pinch it closed. Have your partner start boiling the pierogis about 10-12 at a time max for about 8 minutes. Stir while they’re boiling so they don’t stick to each other or the bottom of the pot. Pull them out with a slotted spoon and quickly shake off the excess water into a colander. And as you are boiling the water will evaporate. Just add more water to the pot and keep going. By the end your kitchen will smell like dinner rolls and the water will be a very deep yellow. You’re using the restaurant method here of using the same starchy water the entire time. These are ready to now be pan fried with those reserved lightly sautéed onions or put into the freezer with the onions on top. Keep making them until you’re out of potatoes.

For the adults because we didn't want to steal from the kids. Mmmm... Too bad this isn't Star Trek and there isn't a replicator, right?
Reward yourself with a big glass of wine and some wonderful pierogies with caramelized onions. Sometimes we add some mushrooms on top to make it really hearty. You can’t go wrong. And you can easily get about 14 dozen pierogies in the 2.5 inch size. When they’re all frozen seal them into smaller portions and Ziploc them. I put them on a tray with freezer paper in between the layers for the initial freezing and then put them in some vacuum sealed bags. We grab and eat for dinner as we’re craving them. The effort is worth it if you’re only option is buying them commercially. If you have a mom and pop operation like that church we had and don’t want to do the work then that’s a great way to get a fix on this craving.
Here’s the cost break down for anyone still paying attention:
5 lb bag of flour $2.50
4 lbs onions $3.88
16 oz of cheese $5.76
5 lbs. potatoes $2.79
Total=$13.93 for ingredients or roughly $0.08/pierogi for 14 dozen.
Buying the commercial ones are roughly $4.99/box here. And I gladly paid $6.50/dozen for the homemade ones when I had the convenience to be able to do so. Quite a difference! Enjoy your pierogies.
Sunday, November 13, 2011
Chicken Fried Rice
I have to admit I have a problem when it comes to eating out. I love going to the restaurants because someone comes to wait on me and I don't have to do dishes! But, that kills the budget. I decided yesterday I really wanted some fried rice. We had chicken in the house because hubs made some cutlets for work the other day so I was using it up. So, without further adieu here's the recipe. It's pretty close to takeout. Hubs even enjoyed it as leftovers for lunch. And it would be 4 servings if you actually remember to eat during the day and maybe serving some spring rolls on the side. I had two huge bowls because it was all I ate.

Jasmine rice 2 cups dry rice cooked in 3 cups water and a little salt. (extra was for the kids)
Cook these ahead of time then stick in the fridge to cool until dinner time. I used my cast iron skillet to pound out the chicken because Daredevil ran off with the mallet and it's currently in an undisclosed location. I put a piece of saran wrap over it before I pounded it. Then when it was all ready to cook I seasoned it with more salt and some fresh cracked black pepper. And usually when I talk about salt it's kosher. It adds a nice flavor in the cooking. The Morton's just sits in a shaker on the table for anyone wanting more salt on their dish.
When it's time for dinner have ready:
1/2 sliced onion
4 oz. sliced mushrooms (more if you're in the mood)
Green onions sliced
1 cup of peas and carrots (I used frozen)
Chilled rice
Chilled chicken
Several handfuls of bean sprouts washed and drained
3 eggs ready to scramble
In the wok:
lightly spray the very bottom to scramble up the eggs. When they are scrambled and starting to turn golden brown take them out and set aside.
Then add sesame oil. I also added a little canola just to help with the temperature because I'm getting used to the new stove. Probably 1 heaping tablespoon of sesame oil and 1/2 tablespoon of canola oil. Let it get nice and hot. It should smell like nirvana in your kitchen.
Chicken fried rice.
2 chicken breasts pounded, sliced into strips then cut into pieces
Jasmine rice 2 cups dry rice cooked in 3 cups water and a little salt. (extra was for the kids)
Cook these ahead of time then stick in the fridge to cool until dinner time. I used my cast iron skillet to pound out the chicken because Daredevil ran off with the mallet and it's currently in an undisclosed location. I put a piece of saran wrap over it before I pounded it. Then when it was all ready to cook I seasoned it with more salt and some fresh cracked black pepper. And usually when I talk about salt it's kosher. It adds a nice flavor in the cooking. The Morton's just sits in a shaker on the table for anyone wanting more salt on their dish.
When it's time for dinner have ready:
1/2 sliced onion
4 oz. sliced mushrooms (more if you're in the mood)
Green onions sliced
1 cup of peas and carrots (I used frozen)
Chilled rice
Chilled chicken
Several handfuls of bean sprouts washed and drained
3 eggs ready to scramble
In the wok:
lightly spray the very bottom to scramble up the eggs. When they are scrambled and starting to turn golden brown take them out and set aside.
Then add sesame oil. I also added a little canola just to help with the temperature because I'm getting used to the new stove. Probably 1 heaping tablespoon of sesame oil and 1/2 tablespoon of canola oil. Let it get nice and hot. It should smell like nirvana in your kitchen.
When the oil is heated add the onions and mushrooms and start cooking them. Add some more salt and pepper. When they start cooking about 2 minutes then add the chicken. Another 2 minutes, add the peas and carrots, green onions and sprouts. Let it all cook for another 2 minutes or so when things just start to wilt nicely. Then add the egg and rice back in. At this point you'll also start adding soy sauce in. I eyeballed it so I can't tell you how much I added. Probably a tablespoon or two. Add another little bit of salt and black pepper if it's not the level you're looking for (TASTE IT!). If it's good slap that on a plate and call it good. Shouldn't take more than 10 minutes to cook. Add another drizzle of the sesame oil and let everyone add their own extra soy sauce. And I'm probably making this again this week as a flat out vegetable one and going hog wild with the mushrooms, onions and sprouts. Enjoy everyone! Hope you enjoy it as much as we did.
Wednesday, October 26, 2011
The weather is getting cooler
Which means nights filled with knitting! I cannot wait to finish up a couple pair of longies for Daredevil. Her pairs from last year still fit because she's a peanut. But, I'm thinking she needs a black pair this year. And I am thinking I'd like to work on a cloak for myself.
Things are a little hectic here. We've moved into a new place. It's bigger and the kids certainly have room to roam now. And that means I am able to work on some nifty projects for them soon. At least, that's what I'm hoping. I'm headed to Goodwill this week to see what I can repurpose to help give the kids a little more creativity without drawing directly on the walls...or the floors. We shall see what I come up with! Off to drop Tot to preschool.
Things are a little hectic here. We've moved into a new place. It's bigger and the kids certainly have room to roam now. And that means I am able to work on some nifty projects for them soon. At least, that's what I'm hoping. I'm headed to Goodwill this week to see what I can repurpose to help give the kids a little more creativity without drawing directly on the walls...or the floors. We shall see what I come up with! Off to drop Tot to preschool.
Tuesday, August 23, 2011
School is in session!
I have some updating to do. Daredevil and I are fighting nasty colds so a little at a time here. Wanted to share our monster stuffed shells that I've recently made for Tot. He's gotten very picky because he needs some dental work done. And Tot has taken to calling himself Monster Turtle over the summer.
1 small container ricotta cheese (12 or 16 oz I can't remember)
1 8 oz pkg shredded mozzarella cheese (or buy bulk and shred your own)
1 egg
2 Tbsp Italian seasoning
2 Tbsp nutritional yeast flakes
3 oz. Pureed garbanzo beans ( I already had them in the freezer frozen into ice cubes which is about 1 oz)
Pinch of kosher salt and black pepper
3 cups spinach put through the food processor until blended nicely
1-2 tbsp olive oil for flavor
Package of cooked large shells. I only cooked them most of the way about 10 minutes. Put some olive oil over them after drained so they're easier to get apart.
Mix the filling together and stuff the shells with the fling. You'll have shells leftover so you might want to double the filling or make half the shells. I got 15 but I stuffed generously. Cook for about 40 minutes in sauce at 350-375 depending on your oven. Tot enjoys them with extra Parmesan on top and he's none the wiser that I made them nutrient packed for him.
Wednesday, June 1, 2011
So, I've been MIA
I've had a lot going on. I'll elaborate later, but I'm not ready right now. I am enjoying time with the family. Daredevil has taken on the task of climbing...and falling. Tot has finished school for the summer. His speech has come so far in the past six months. It's amazing and I couldn't be happier. It's just a quick hello for now. Off to wrangle kids.
Subscribe to:
Posts (Atom)